Saturday 28 May 2016

Apply/Add restrictions on a component

In real time scenarios sometimes we have requirements to restrict some sort of information to few customers only. So for such kind of requirements we have concept of restrictions. We have multiple type of restrictions in Hybris. To see type of restrictions login to hmc tool http://localhost:9001/hmc/hybris

Go to WCMS -> Restrictions type. See screen shot below


Now, how we can add restriction to a component. To explain restrictions lets take user restriction as of now. Follow below steps.

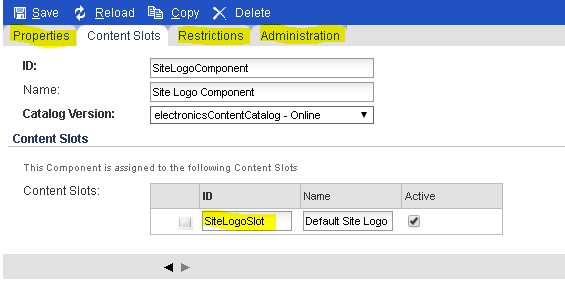
1.) Go to WCMS-> Components and search for sitelogocomponent
2.) Double click that component and go to restrictions section of that. Right click on restriction and create new restriction as shown below.


3.) Below screen will be displayed. Enter the details like name, id ,catalog version, name of the component this restriction applied to and the user id of the user as this restriction type is user restriction. 
Screen shot below for reference.


4.) Save and close
5.) Open electronics site locally and we could see the restriction is applied on the SiteLogo component.As the site logo is restricted to the user, we can't see the site logo in general. See screen shot below.


6.) Now lets login with customer 'kuldeep.gju@gmail.com' which we added as user in restriction and observed that the logo is displayed. See screen shot below.


7.) Now go back to component sitelogocomponent and remove that restriction and save. Now you can again see the logo even though user is not logged in.

This is how we can add restrictions on components and we can also define which page we can choose for those components

Thursday 19 May 2016

Concept of page slots/ Components and content slots

In Hybris, we generally have a hierarchy of components which builds each page.

Components are basically Areas on JSP for adding the dynamic contents. At top level we have page templates.  Page template contains multiple page slots. Page slots contains multiple components and then each component can contain multiple content slots.

The concept is something similar to IBM - WCS e-spots. Where we use to have multiple content slots in an e-spot. Below are the snapshots which will help you understand the concept.

All the associated mapping like which template is associated with which page, which all components/content slots are linked with a page is defined in "cms-content.impex" located at below location for my case

/kuldeepinitialdata/resources/kuldeepinitialdata/import/coredata/contentCatalogs/catalogName/cms-content.impex

Let's start with home page. If we check the above impex file, we can see that the template used for home page is "LandingPage2Template" as shown below.


Now lets login to cmscockpit to see that template.
Url - http://localhost:9001/cmscockpit/hybris
Username/Pwd - admin/nimda

The below screen will appear. Choose the site(electronics in our case) from left hand side and you can see all the templates at right hand side of the panel.


Double click on the page template to edit or see what all page slots/ components are there. Below screen would be displayed on double click.The red page slots shows that these slots are shared by multiple pages. To edit any section, click on the lock to unlock and then edit it.

Lets focus on page slot "SiteLogoSlot". This contains "SiteLogoComponent" to display the logo across the site. By editing this component we can change the logo of site anytime.


There is one more alternate way of editing the components through HMC tool. Open tool with below information.

URL - http://localhost:9001/hmc/hybris
Username/Pwd - admin/nimda

1.) Go to WCMS > Components > Search for SiteLogoComponent
2.) In search we can see that 2 SiteLogoComponents are displaed. One for stage and one for online.
3.) Generally we change in stage and then changed are propagated to online via Sync.
4.) On local we can directly do the changes in online to reflect directly on site


5.) Double click on the component and you can see the below window where you can edit it. 

  • Property section includes things like name, id should be visible or not
  • Content slot section contains the information of the content slot
  • Restrictions sections has information about any restriction applied on the content or not
  • Administration section contains information like type of components, information of any changes made 


Enjoy playing with site components now.. 

Friday 13 May 2016

Understanding springmvcstore Extension Template

The springmvcstore template is a small, simple web shop application based on Spring MVC. Basically, springmvcstore is an implementation of the hybris Multichannel Suite Ordering Process. It allows logging in, browsing of products, and ordering. It does not use Commerce functionality, such as vouchers. Also note that this template only consists of a web extension module and, for example, does not contain an items.xmlfile. This extension also presents the concept of a web-container separated unit test for Controller logic as well as usage of Spring Security.

The springmvcstore extension uses:
  • The web extension module
  • Spring Web MVC frontend technology
  • Use cases
  • Logging in and out
  • Browsing products
  • Ordering
  • Testing controllers

The springmvcstore Extension Structure

The extension only consists of a web module. It provides the following directories:
  • web/src: Contains Facade, Controller, and DTO classes, as well as classes for converting a model to a DTO. It also contains some form classes.
  • web/testsrc: Contains classes for testing controllers.
  • web/webroot: Contains JSP files for views.
  • web/webroot/WEB-INF: Contains web.xml for servlet configuration and activating Spring Security, springmvcstore-web-spring.xml for configuration of Spring Security, springmvcstore-servlet.xml for configuration of dispatcher servlet and OS cache related configuration files.

Furthermore, the resources folder contains resource bundle files for formatting representation classification attributes
Dispatcher Servlet
The Spring Web MVC DispatcherServlet, acting as the front controller, receives all requests and dispatches them to the appropriate controllers. This servlet is configurable using the extension's web.xml file.
Spring Web MVC Beans
Spring Web MVC defines several beans whose use is shown in the springmvcstore template:
  • Controllers: Responsible for receiving requests from the DispatcherServlet and building the related model upon receiving data from business facades or user input and returning an appropriate literal for the view.
  • Handler Mappings: Responsible for mapping incoming web requests to handlers. Spring provides several handler mappings for common use cases, but new implementations can be defined by implementing the org.springframework.web.servlet.HandlerMapping interface.
  • View Resolvers: Responsible for mapping a view name to a view. Spring provides several view implementations for use. Thespringmvcstore template utilizes JSP for the view technology.
  • Locale Resolvers: Responsible for determining the Locale to use for a request. Spring provides several locale resolvers, including resolvers for inspecting the request accept header, cookie, and session.
  • Theme Resolvers: Responsible for determining the theme to use for a request.
  • Multipart File Resolvers: Responsible for handling file upload.
  • Exception Resolvers: Responsible for mapping exceptions to views and implementation of exception handling code.

Class Interaction Flow diagram

This conceptualized interaction flow shows how a request is made from the front-end:


The central part of this process uses controllers which receive model and form objects from the Spring framework filled in by users or some initialization logic. The controllers decide which view literal they will switch to.

This interaction diagram shows a sample submit action:


Classes or stereotypes of classes accept actions during the POST method being triggered from the front end. The Validator, Facade, Service, and Converter objects encompass the business logic of the process.
Several services from the hybris core are utilized in the Facade classes.


Thursday 12 May 2016

Understanding Hybris Data Models

Data Models are defined in the <extension>-items.xml file of each extension. Essentially data entities (called "items" in hybris) are defined with itemtype elements, whereas relations between items are defined with relation elements.

Below is the sample <extension>-items.xml.

            xsi:noNamespaceSchemaLocation="items.xsd">
    
    <itemtypes>
        <itemtype code="Stadium" generate="true" autocreate="true">
            <deployment table="CuppyTrailStadium" typecode="10123" />
            <attributes>
                <attribute qualifier="code" type="java.lang.String" >
                    <persistence type="property"/>
                    <modifiers optional="false" unique="true"/>
                </attribute>
                <attribute qualifier="capacity" type="java.lang.Integer">
                    <description>Capacity</description>
                    <persistence type="property" />
                </attribute>
            </attributes>
        </itemtype>
    </itemtypes>
</items>


itemtype code=Stadium generate=true autocreate=true
  • defines a new type Stadium which implicitly extends from GenericItem
  • autocreate=true indicates that Stadium is a new type
  • generate=true creates required sourcecode (not the model class) for the type

deployment table=CuppyTrailStadium typecode=10123 
  • specifies how the new type is mapped to the database
  • table defines the database table
  • typecode is used internally e.g. to create item pks. Typecodes between 0 and 10000 are reserved by hybris
attribute qualifier=code type=java.lang.String
  • creates a new attribute code by using the atomic type java.lang.String
persistence type=property
  • Defines how item are stored. property reflects the normal persistent behaviour

modifiers ...
  • advanced settings like read and write access

Relations

The below sample code shows the relation we define in xml


<relations>
    <relation code="StadiumMatchRelation" localized="false" generate="true" autocreate="true">
       <sourceElement type="Stadium" qualifier="stadium" cardinality="one" />
       <targetElement type="Match" qualifier="matches" cardinality="many"/>
    </relation>
</relations> 

  • Define a new relationship StadiumMatchRelation between Stadium and Match using the relation tag
  • Add the above element immediately  before the itemtypes element
  •  The relation is a one-to-many relation. which means that the mapping will be done by an additional column on the many side, i.e. the table Match

  Enumtypes

  The following element before the relations element in any <extension>-items.xml

<enumtypes>
        <enumtype code="StadiumType" autocreate="true" generate="true" dynamic="false">
            <value code="openair"/>
            <value code="enclosed"/>
        </enumtype>
        <enumtype code="StadiumAccess" autocreate="true" generate="true" dynamic="true">
            <value code="road"/>
            <value code="rail"/>
            <value code="plane"/>
        </enumtype>
</enumtypes>


We can also define the default values for an attribute


<attribute type="StadiumType" qualifier="StadiumType">

    <persistence type="property"/>
    <defaultvalue>em().getEnumerationValue("StadiumType","openair")</defaultvalue>
</attribute>

In Simple words if we related this with JAVA, then we can say that Type in Hybris is same as class in Java and Item in Hybris is same as Object in Java


Understanding Accelerator extension structure

Modulegen copies codes from Accelerator extension template to your custom extension folder. It is important to understand the significance of the accelerator structure as it will help in finding out the place where you need to make change for your personal customization,dependency between different extension and platform .It will further help in writing cleaner and modularized code which will assist in extending hybris platform services and easier hybris version update process in future.

Once you have completed the steps mentioned in Create/Publish store you will find out that modulegen has added 7 new extensions folder to C:\hybristest\hybris\bin\custom\training folder.

We will explore the structure and importance of new custom extensions :


1.)trainingcockpits  
This extension is where you will programmatically extend hybris cockpit business tools to customize existing features of a cockpit or add additional features. It extends the acceleratorcoreextension.All the  XML file based configuration that is added to any of the extension will be added to  acceleratorcore extension
2.)trainingcore
It is the business service layer extensions where the data model is extended, services from other hybris extensions are combined, added to and enriched and further services are added for project use. This extension come with a core and hybris Management Console (hMC) module. All core data vital for the provisioning of an accelerator storefront is loaded in the trainingcore extension as a part of essential and project data. You can alter these scripts and add further data scripts here.
3.)trainingfacades
This extensions organize and aggregate multiple business services to provide a storefront API that exposes actions and a data model that is optimized for a B2C commerce front-end use. It extends the functionality offered by the commercefacades extension and would be where a you would add all additional facades and customize the commercefacades extension functionality. It has a core module but no hybris Management Console (hMC) and web module.
4.)trainingfulfilmentprocess
Here you can extend and customize the fulfillment process that comes OOB with hybris. It contains order process and consignment process XMLs that define the order fulfillment and management process in Hybris
5.)traininginitialdata
It is used to add data for running and setting up  your storefront and application. It provides initial impex templates. From here acceleratorsampledata extension is coupled to this particular implementation. The acceleratorsampledata extension adds all the products and content necessary for each of the three sample storefronts as well as test promotions, users, advanced personalization rules and etc.. A project would not go live with acceleratorsampledata extension, it is provided purely as a sample. The data is separated into this extension to make it very easy to not include the sample data as a part of a project.
6.)trainingstorefront
This extensions contain the code for the front-end tiers that expose storefront functionality using web site. And do not have a core or the hybris Management Console (hMC) module.
7.trainingtest
Here you can put your JUnit testcases to test the functionality provided by your implementation. It Provides  tools, configuration and data for testing hybris Multichannel Accelerator.